Create articles from any YouTube video or use our API to get YouTube transcriptions
Start for freeIntroduction to Custom Email Subscriptions with Power Automate
Power BI is a powerful tool for data visualization and analysis, but sometimes you need to share specific data with team members in a more direct way. This is where Power Automate comes in, allowing you to create custom email subscriptions that deliver targeted information to the right people at the right time.
In this article, we'll explore how to use Power Automate to send customized email subscriptions containing data from your Power BI reports. This method offers several advantages over the built-in email subscriptions in Power BI:
- Complete customization of recipients and content
- Ability to attach or embed data directly in the email
- No requirement for Premium licensing
- Recipients don't need Power BI licenses to view the data
Let's dive into the process of setting up these custom email subscriptions.
Setting Up Your Power BI Report
Before we start working in Power Automate, we need to prepare our Power BI report with the exact data we want to send in the emails.
Creating the Data Table
- In your Power BI report, create a table or visual that contains the data you want to send.
- Apply any necessary filters at the visual level. For example:
- Use a relative date filter to show data from the last 30 days
- Filter out blank values in relevant columns
Capturing the DAX Query
To get the data into Power Automate, we need to capture the DAX query that generates our table:
- Open the "Optimize" tab in the Power BI ribbon
- Click on "Performance Analyzer"
- Press "Start Recording"
- Refresh the visuals on the page
- Stop the recording
- Expand the details for your table
- Find the DAX query and click "Copy Query"
Publishing the Report
Make sure to publish your report to the Power BI service before creating the Power Automate flow. This ensures that all the referenced fields are available when setting up the flow.
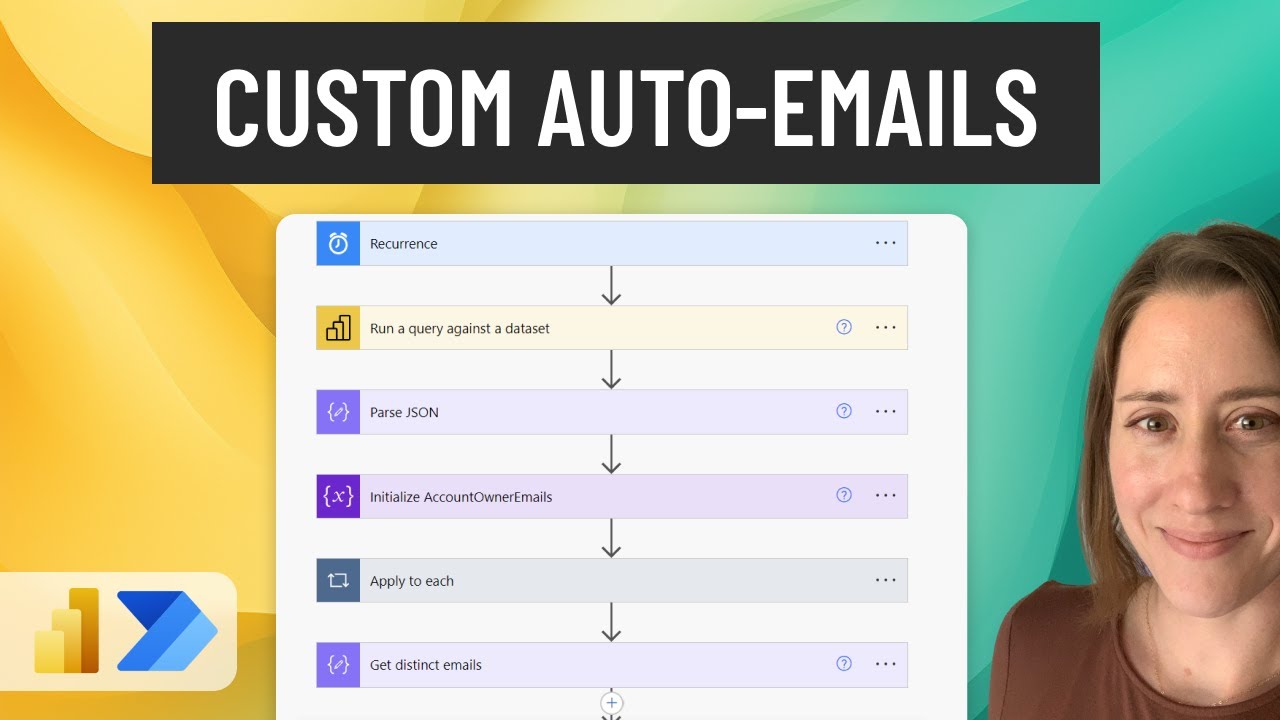
Creating the Power Automate Flow
Now that our Power BI report is ready, let's create the Power Automate flow to send our custom email subscriptions.
Setting Up the Flow
- Go to Power Automate (https://flow.microsoft.com)
- Click "Create" and choose "Scheduled cloud flow"
- Give your flow a descriptive name
- Set the start time and recurrence (e.g., weekly on Monday)
- Click "Create"
Querying the Power BI Dataset
- In your new flow, click "New step"
- Search for "Power BI" and select "Run a query against a dataset"
- Choose your workspace and dataset
- In the "Query text" field, paste the DAX query you copied from Power BI
- Test the step to ensure it works correctly
Parsing the JSON Response
- Add a new step and search for "Parse JSON"
- For the "Content" field, select "first(body('Run_a_query_against_a_dataset')?['Tables'])?['Rows']"
- To generate the schema:
- Run a test on your flow
- Copy the output from the "Run a query against a dataset" step
- Click "Generate from sample" in the Parse JSON step
- Paste the copied output and click "Done"
Initializing Variables
- Add a new step to initialize a variable
- Name the variable "account_owner_emails"
- Set the type to "Array"
Populating the Email Array
- Add an "Apply to each" control
- Set the input to the "body" output from the Parse JSON step
- Inside the loop, add an "Append to array variable" action
- Select the "account_owner_emails" variable
- Set the value to the email address field from your dataset
Getting Distinct Email Addresses
To avoid sending multiple emails to the same person:
- Add a "Compose" action
- In the "Inputs" field, use this expression:
union(variables('account_owner_emails'), variables('account_owner_emails')) - Rename this step to "Get distinct emails"
Sending Emails to Each Recipient
- Add another "Apply to each" control
- Set the input to the output of the "Get distinct emails" step
- Inside this loop, add a "Filter array" action
- Filter the body of the Parse JSON step
- Set the condition to where the email address matches the current item in the loop
Creating the Email Content
You have two options for including the data in your email:
Option 1: HTML Table
- Add a "Create HTML table" action
- Use the output of the Filter array step as the input
- Customize the column names under "Advanced options"
Option 2: CSV Attachment
- Add a "Create CSV table" action
- Use the output of the Filter array step as the input
- Customize the column names under "Advanced options"
Sending the Email
- Add a "Send an email (V2)" action
- Set the recipient to the current item in the loop (the email address)
- Create a subject line (you can use dynamic content if desired)
- For the body, insert the output of the "Create HTML table" step
- If using a CSV attachment, add it under "Advanced options"
Testing and Finalizing Your Flow
Before activating your flow for regular use, it's crucial to test it thoroughly:
- Save your flow
- Click "Test" in the top right corner
- Choose "Manually" and run the test
- Review each step of the flow to ensure it's working as expected
- Check your email to verify the format and content of the message
If you're satisfied with the results, you can activate your flow for regular use. If not, make any necessary adjustments and test again.
Best Practices and Tips
To make the most of your custom email subscriptions, consider these best practices:
Optimizing Data Selection
- Carefully choose the data to include in your emails
- Use filters in Power BI to limit the amount of data sent
- Consider using relative date filters to always send the most recent information
Customizing Email Content
- Use clear, descriptive subject lines
- Format the HTML table for better readability
- Include relevant context or instructions in the email body
Managing Recipients
- Regularly review and update the list of recipients
- Consider using dynamic recipient lists based on roles or departments
Performance Considerations
- Monitor the run time of your flow, especially for large datasets
- If performance becomes an issue, consider breaking the flow into smaller, more targeted subscriptions
Security and Compliance
- Ensure that your data sharing practices comply with your organization's policies
- Use secure methods for storing and transmitting sensitive information
Troubleshooting Common Issues
If you encounter problems with your custom email subscription flow, here are some common issues and solutions:
Flow Fails to Run
- Check that your Power BI report is still published and accessible
- Verify that the DAX query is still valid (dataset changes can break queries)
- Ensure that your Power Automate and Power BI permissions are up to date
Emails Not Received
- Check spam folders
- Verify that email addresses are correct and active
- Ensure that your organization's email policies allow these automated messages
Incorrect or Missing Data
- Review your DAX query and filters in Power BI
- Check that the correct columns are selected in the Power Automate flow
- Verify that date ranges or other dynamic filters are working as expected
Extending the Functionality
Once you've mastered the basics of custom email subscriptions, you can explore more advanced features:
Conditional Formatting
Use Power Automate's conditional statements to format data or send emails only when certain conditions are met.
Multiple Data Sources
Combine data from multiple Power BI reports or even different data sources in a single email.
Interactive Elements
Include buttons or links in your emails that allow recipients to take actions directly from the email.
Scheduled Snapshots
Use a similar technique to create scheduled snapshots of your Power BI data, preserving historical data points.
Conclusion
Custom email subscriptions using Power Automate offer a powerful way to share targeted Power BI data with your team. By following the steps outlined in this article, you can create personalized, data-rich emails that deliver the right information to the right people, without the need for premium licensing or additional Power BI subscriptions.
Remember to regularly review and refine your subscription flows to ensure they continue to meet your team's needs. With practice, you'll be able to create sophisticated data sharing workflows that enhance decision-making and keep everyone informed with minimal manual effort.
By leveraging the combined power of Power BI and Power Automate, you're not just sharing data – you're creating a more connected, informed, and efficient organization.
Article created from: https://youtu.be/5-0KH0IiDjU?si=Dua8SjcTPdDjMClK