Create articles from any YouTube video or use our API to get YouTube transcriptions
Start for freeIntroduction to Fabric Shaders in Blender
Creating realistic fabric in Blender can elevate the quality of your 3D projects to new heights. Whether you're a budding 3D artist or an experienced professional, mastering the art of fabric shaders and simulations is essential. In this comprehensive guide, we'll walk you through the process of creating a basic fabric shader, enhancing it with procedural textures for added realism, and finally, applying cloth simulations for dynamic effects. Let's unravel the secrets to fabric shaders in Blender and bring your digital creations to life.
Starting with the Basics
Our journey begins with a simple cloth backdrop object in Blender. The initial step involves working with the Principled BSDF Shader, which is the foundation of our fabric material. Here's how to start:
-
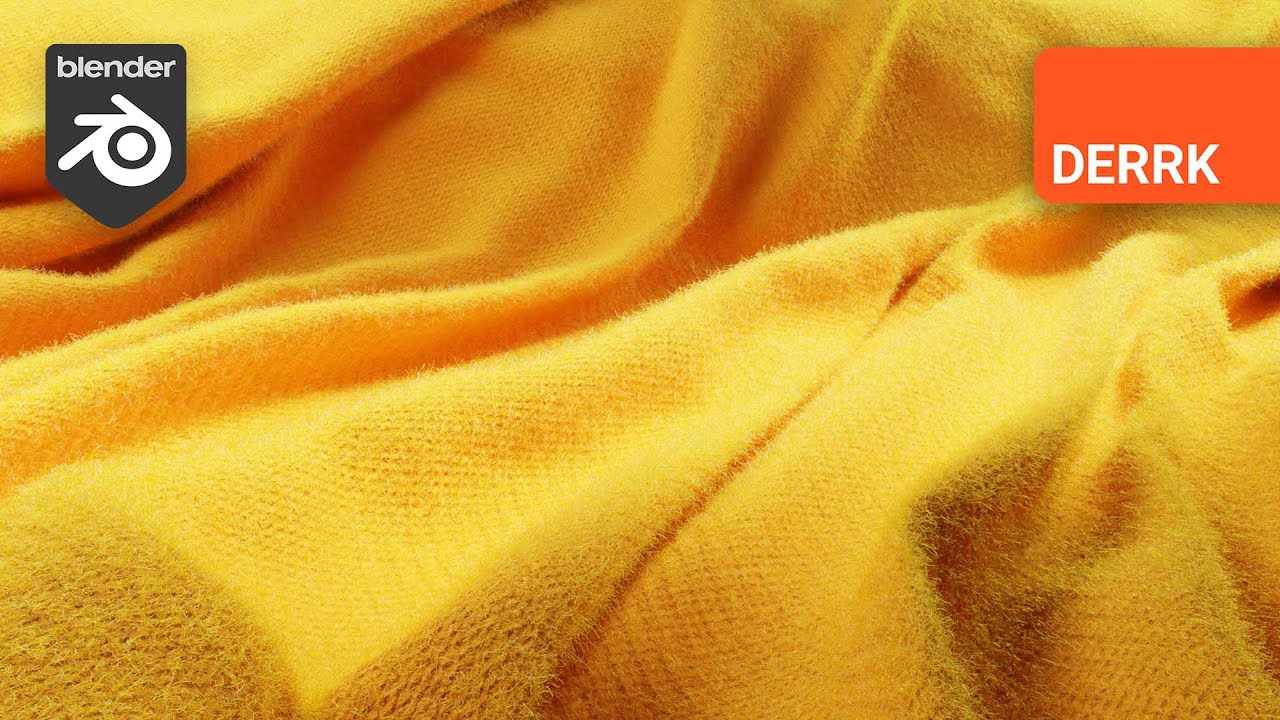
Set a Color: Choose a color that resembles the fabric you're aiming to create. An orangish-yellow shade can provide a warm, realistic look.
-
Adjust Roughness: Increase the roughness value to simulate the less reflective, matte finish of fabric. A value close to 1.0 is ideal, but you can tweak it slightly for the desired effect.
Adding Texture for Realism
Textures play a crucial role in adding depth and realism to your fabric. We'll introduce two key textures:
-
Magic Texture: This texture, when combined with a Vector Bump node and connected to the shader's normal input, creates a base pattern for the fabric.
-
Wave Texture: Adding a wave texture introduces directionality and variation, simulating the weaving patterns found in real fabrics. Adjusting the scale and distortion values allows you to fine-tune the appearance.
Achieving Realistic Fuzz
To give the fabric a lifelike fuzz, we'll employ a Noise Texture with a Color Ramp to control the distribution. Increasing the distortion value adds to the fuzzy appearance, making the fabric more tactile and realistic.
Implementing Cloth Simulations
For dynamic scenes, applying cloth simulations can add a layer of realism. Here's a brief overview:
-
Create a Plane: Start with a plane and modify it to serve as a base for the cloth to interact with.
-
Subdivide for Detail: Subdividing the mesh increases the detail level, allowing for more intricate folds and wrinkles in the simulation.
-
Apply Cloth Physics: Adding cloth physics to the plane and adjusting settings like friction and Brownian motion ensures realistic behavior.
-
Self Collisions: Enabling self-collisions prevents the cloth from intersecting itself, adding to the realism of the simulation.
Final Touches
Adjusting the material properties of the fuzz and experimenting with various texture settings can further enhance the realism of your fabric. Don't be afraid to play with the values and see what works best for your specific project.
Conclusion
Creating realistic fabric in Blender is a rewarding process that combines technical skill with artistic vision. By starting with a basic shader and progressively adding complexity through textures, fuzz, and simulations, you can achieve stunningly realistic fabric materials for your 3D projects. Remember, practice is key, so experiment with different settings and techniques to discover what works best for your creative vision. Happy rendering!
For more detailed guidance and visual demonstrations, be sure to check out the full video tutorial here.