Create articles from any YouTube video or use our API to get YouTube transcriptions
Start for freeTransforming 2D Sketches into 3D Drawings: An Isometric View Tutorial
Welcome back to another enlightening tutorial where we dive into the fascinating world of 3D drawing from a 2D perspective, specifically focusing on the O2U isometric view. This guide is tailored for both beginners and seasoned designers looking to refine their skills in creating detailed 3D models from basic 2D sketches.
Getting Started with the Basics
The journey begins with creating a sketch on any desired plane, although the XY plane is often a good starting point. The primary focus is on developing a foundational understanding of transforming a simple 2D sketch into a robust 3D drawing. This process involves several key steps:
-
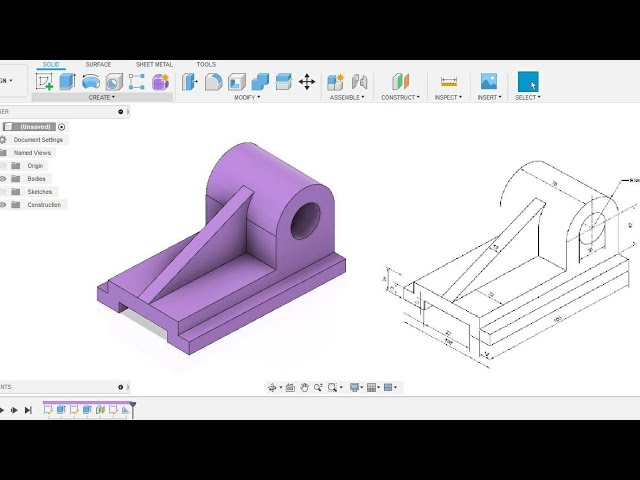
Constructing the Base: The foundation of our 3D model is a rectangular base, extruded to a precise measurement of 160mm. This step is crucial as it sets the stage for more complex features to be added atop.
-
Adding Circular Profiles and Holes: Following the base, attention shifts to incorporating a circular profile complete with a central hole, further enhancing the model's complexity.
-
Creating Ribs for Structural Support: The final touch involves adding a rib, a critical component that not only supports the structure but also adds to the overall aesthetic.
Step-by-Step Process
Creating the Rectangular Base
- Begin with a construction line, using the line command (
L) to draw a center construction line from an origin point of your choosing. - Utilize the 'Rectangle' tool to create a two-point rectangle, ensuring it's symmetric about the construction line.
- Dimension the outer rectangle to 100mm by 24mm, providing a solid base for further detailing.
Adding Depth and Complexity
- Introduce a circular profile within the base, ensuring it's symmetric and properly dimensioned to 52mm by 10mm.
- Create additional pockets sized 12mm by 12mm, further detailing the model.
- Trim any excess dimensions to maintain a clean sketch, preparing it for extrusion.
Extrusion and Final Touches
- Extrude the base to 160mm, setting the stage for additional features.
- Sketch and extrude a circular profile on the selected face, paying close attention to the radius and diameter specifications for accuracy.
- Add perpendicular lines and trim excess parts to shape the profile correctly before extrusion.
- Finalize the model by adding a rib, centered and with a thickness of 12mm, ensuring it's tangent to the inner circle for a seamless integration.
Conclusion and Tips for Success
This tutorial covers the essential steps for transforming a 2D sketch into a detailed 3D drawing. By following these steps carefully, you can create complex models with precision and ease. Remember, practice is key to mastering the art of 3D drawing from 2D sketches. Don't hesitate to experiment with different shapes and dimensions to enhance your skills further. If you have any questions or would like to share your creations, feel free to comment below. Your feedback is invaluable as we continue to explore the limitless possibilities of 3D design together.
Don't forget to share this tutorial with fellow enthusiasts and subscribe for more insightful content. Happy drawing!