Create articles from any YouTube video or use our API to get YouTube transcriptions
Start for freeIntroduction to CustomTkinter
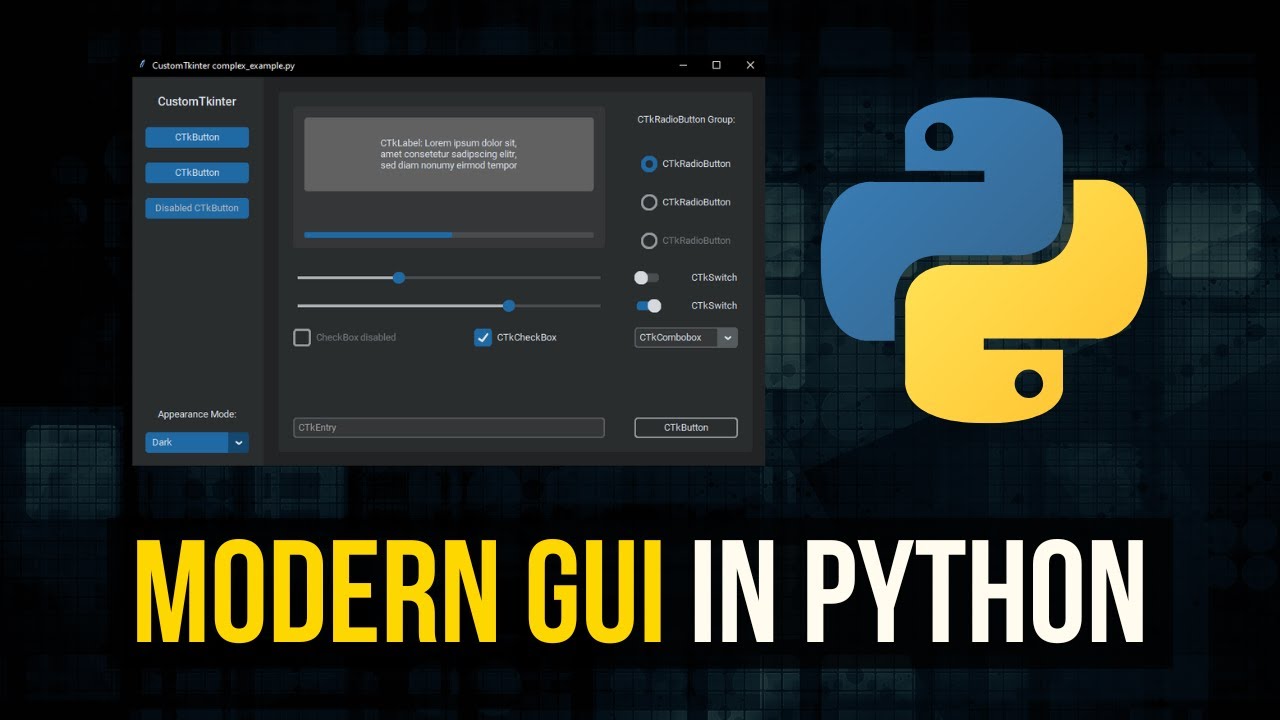
Python developers looking to create modern, visually appealing graphical user interfaces (GUIs) now have a powerful tool at their disposal: CustomTkinter. This external Python module builds upon the core Tkinter library, offering an easy-to-use solution for crafting contemporary UI designs. In this comprehensive guide, we'll explore how to harness CustomTkinter's capabilities to build attractive, functional interfaces for your Python applications.
Getting Started with CustomTkinter
Installation
Before we dive into creating our GUI, we need to install the CustomTkinter module. Open your command line interface and run the following command:
pip install customtkinter
Once the installation is complete, you're ready to start building your modern GUI.
Importing CustomTkinter
To begin using CustomTkinter in your Python script, import it at the top of your file:
import customtkinter
Setting Up the Basic Parameters
CustomTkinter allows you to easily set the overall appearance and color scheme of your application. Let's configure these settings:
Appearance Mode
You can choose between three appearance modes:
- System (uses your operating system's default setting)
- Dark
- Light
Set the appearance mode with the following code:
customtkinter.set_appearance_mode("dark")
Color Theme
CustomTkinter offers three color themes:
- Blue
- Green
- Dark-blue
Set your preferred color theme like this:
customtkinter.set_default_color_theme("dark-blue")
Creating a Basic GUI: Login System Example
Let's create a simple login interface to demonstrate CustomTkinter's capabilities. We'll build a window with a username field, password field, login button, and a "remember me" checkbox.
Setting Up the Root Window
First, we'll create the main window for our application:
root = customtkinter.CTk()
root.geometry("500x350")
This creates a window sized 500x350 pixels.
Creating a Frame
We'll use a frame to organize our UI elements:
frame = customtkinter.CTkFrame(master=root)
frame.pack(pady=20, padx=60, fill="both", expand=True)
Adding UI Elements
Now, let's add the various elements to our login interface:
Title Label
label = customtkinter.CTkLabel(master=frame, text="Login System", font=("Roboto", 24))
label.pack(pady=12, padx=10)
Username Entry
entry1 = customtkinter.CTkEntry(master=frame, placeholder_text="Username")
entry1.pack(pady=12, padx=10)
Password Entry
entry2 = customtkinter.CTkEntry(master=frame, placeholder_text="Password", show="*")
entry2.pack(pady=12, padx=10)
Login Button
button = customtkinter.CTkButton(master=frame, text="Login", command=login)
button.pack(pady=12, padx=10)
Remember Me Checkbox
checkbox = customtkinter.CTkCheckBox(master=frame, text="Remember Me")
checkbox.pack(pady=12, padx=10)
Implementing the Login Function
For this example, we'll create a simple login function that just prints "test" when the button is clicked:
def login():
    print("test")
In a real application, you would implement actual login logic here.
Running the Application
Finally, to run our application, we add:
root.mainloop()
Advanced CustomTkinter Features
CustomTkinter offers many more advanced features and widgets that can enhance your GUI:
Combo Boxes
Combo boxes allow users to select from a predefined list of options:
combo = customtkinter.CTkComboBox(master=frame, values=["Option 1", "Option 2", "Option 3"])
combo.pack(pady=12, padx=10)
Radio Buttons
Radio buttons are useful for selecting one option from a group:
radio_var = tkinter.IntVar(value=0)
radio1 = customtkinter.CTkRadioButton(master=frame, variable=radio_var, value=1, text="Option 1")
radio2 = customtkinter.CTkRadioButton(master=frame, variable=radio_var, value=2, text="Option 2")
radio1.pack(pady=12, padx=10)
radio2.pack(pady=12, padx=10)
Sliders
Sliders can be used for selecting a value from a continuous range:
slider = customtkinter.CTkSlider(master=frame, from_=0, to=100, number_of_steps=10)
slider.pack(pady=12, padx=10)
Progress Bars
Progress bars are great for showing the status of an operation:
progress = customtkinter.CTkProgressBar(master=frame)
progress.pack(pady=12, padx=10)
progress.set(0.5)  # Sets progress to 50%
Customizing Your GUI
CustomTkinter allows for extensive customization of your GUI elements. Here are some ways you can tailor your interface:
Changing Widget Colors
You can change the colors of individual widgets:
button = customtkinter.CTkButton(master=frame, text="Custom Button", fg_color="#FF5733", hover_color="#C70039")
Modifying Font Styles
Customize the font of your labels and buttons:
label = customtkinter.CTkLabel(master=frame, text="Styled Label", font=("Arial", 18, "bold"))
Adjusting Widget Sizes
Control the size of your widgets:
entry = customtkinter.CTkEntry(master=frame, width=300, height=40)
Best Practices for GUI Design
When designing your GUI with CustomTkinter, keep these best practices in mind:
- Consistency: Maintain a consistent look and feel throughout your application.
- Simplicity: Don't overcrowd your interface. Keep it clean and intuitive.
- Responsiveness: Ensure your GUI responds quickly to user interactions.
- Accessibility: Consider users with different needs when designing your interface.
- Feedback: Provide visual feedback for user actions (e.g., button hover effects).
Comparing CustomTkinter to Standard Tkinter
While CustomTkinter builds upon Tkinter, it offers several advantages:
- Modern Appearance: CustomTkinter widgets look more contemporary out of the box.
- Easier Theming: Changing the overall look of your application is simpler with CustomTkinter.
- Responsive Design: CustomTkinter widgets adapt better to different screen sizes and resolutions.
- Consistent Cross-Platform Look: Your GUI will look more consistent across different operating systems.
Integrating CustomTkinter with Other Python Libraries
CustomTkinter can be easily integrated with other Python libraries to create powerful applications:
Data Visualization
Combine CustomTkinter with matplotlib or Plotly to create interactive data visualization tools:
import matplotlib.pyplot as plt
from matplotlib.backends.backend_tkagg import FigureCanvasTkAgg

fig, ax = plt.subplots()
ax.plot([1, 2, 3, 4])
canvas = FigureCanvasTkAgg(fig, master=frame)
canvas.draw()
canvas.get_tk_widget().pack()
Database Integration
Connect your GUI to a database using libraries like SQLite or MySQL:
import sqlite3

conn = sqlite3.connect('example.db')
c = conn.cursor()

def save_user():
    username = entry1.get()
    password = entry2.get()
    c.execute("INSERT INTO users VALUES (?, ?)", (username, password))
    conn.commit()

button = customtkinter.CTkButton(master=frame, text="Save User", command=save_user)
button.pack()
Troubleshooting Common Issues
When working with CustomTkinter, you might encounter some common issues. Here's how to address them:
- Widget Not Appearing: Ensure you've called the appropriate geometry manager (pack, grid, or place) for each widget.
- Incorrect Styling: Double-check that you're using the correct CustomTkinter widget classes (CTk prefix) instead of standard Tkinter classes.
- Performance Issues: If your GUI is slow, consider optimizing your code or reducing the number of widgets.
- Font Not Found: If a specified font is not available on the system, CustomTkinter will fall back to a default font. Ensure you're using widely available fonts or include custom fonts with your application.
Conclusion
CustomTkinter provides a powerful and user-friendly way to create modern GUIs in Python. By leveraging its pre-designed widgets and easy customization options, you can quickly build attractive and functional interfaces for your applications. Whether you're creating a simple login screen or a complex data analysis tool, CustomTkinter offers the flexibility and aesthetics needed for professional-looking software.
As you continue to explore CustomTkinter, remember to refer to the official documentation and examples for more advanced features and techniques. With practice and experimentation, you'll be able to create sophisticated GUIs that enhance the user experience of your Python applications.
Happy coding, and enjoy building beautiful interfaces with CustomTkinter!
Article created from: https://youtu.be/iM3kjbbKHQU?si=gLbylhip5z095l8t